Fetters, shackles—these are age-old terms going back to Biblical days. Unfortunately, as long as man has wronged his fellow man—think Cain slaying Abel here—the pursuit of justice has meant at some point temporarily restraining the guilty party in the process.
And metallic handcuffs have been a part of that (and police work) since they were developed and the first paladin kept watch over the sleeping citizenry.
- RELATED: Survival Tactics of First Responders at the ILEETA Conference
- RELATED: Patrol Ready: PR-24 Baton Control Tactics
Handcuffs have not changed much since they were originally developed as oval-shaped iron or steel rings that could be riveted or locked shut with a length of chain between the two. Every modern street cop carries at least one set of handcuffs on duty. Most active street cops I know carry at least two; it always seems that bad guys, like wolves, travel in packs.
Advertisement — Continue Reading Below
Restraint Types
New handcuff designs over the last 25 years include hinged cuffs, larger cuffs for bigger wrists, models that include polymer in their construction and flex-cuffs. Hinged cuffs restrict movement more than conventional chained cuffs, and they can be used to generate more leverage to force a suspect’s hands behind his or her back, or to apply pain against the wrist, forcing the subject to comply and quit resisting.
Advertisement — Continue Reading Below
Considering the ever-increasing amount of gear cops are forced to carry on their duty belts, lighter-weight handcuffs that incorporate polymer in their lock housings can be a boon for LEOs. ASP, Inc., makes handcuffs—chain, hinged or rigid designs—that are made of aluminum or steel and incorporate polymer. ASP even offers different color housings so that jailers can segregate offenders based on classification.
Disposable restraints such as flex-cuffs are essentially beefed-up cable ties that are designed to have a tensile strength of 300 pounds. There are different makers of these plastic restraints, which include single-loop versions, double-loop versions and even plastic cuffs that have a lock with a standard cuff key so you don’t have to remove them by using safety scissors or snips. These plastic types of cuffs are nice because you can carry a lot for riot-control duties. I’ve known officers who used to carry them inside the brim of their patrol caps or under their duty belts back in the day. SWAT operators usually have several on their entry vests.
Advertisement — Continue Reading Below
Suspect Types
Pressure Point Control Tactics (PPCT), defensive tactics or suspect control programs teach that there are three types of people to handcuff: the totally uncooperative subject, the totally cooperative subject and the potentially uncooperative subject. The first person, the totally uncooperative subject, must be controlled first. Too often on the street I saw cops trying to handcuff a person who was actively fighting back. Tying up one of their hands that could be used for striking, grabbing or joint-locking the suspect, they would attempt to chase the arm around as the subject flailed or struck. Put simply, you cannot handcuff someone who is fighting you. Concentrate on controlling them first, then handcuff.
The problems with dealing with the next two subjects, who are either cooperating or feigning cooperation, is that officers tend to let their guards down. I’ve seen officers gingerly apply handcuffs—“Put your hands behind your back, please” —thinking or operating under the faulty assumption that if the officer acts nice and handcuffs comfortably, the suspect will be nice, too. Of course, when the officer makes contact or applies the first handcuff, the suspect realizes the gravity of the situation, i.e., they are going to jail, and the fight is on.
Advertisement — Continue Reading Below
I tell my officers that when you penetrate the reaction gap (move inside 6 feet) your hands should be up and you should be ready for resistance. Grab the subject first, establish control and then apply the handcuffs while maintaining control. The first handcuff is like a switch, and you better be ready for resistance.
If the suspect resists, you can either escalate your force control or disengage and possibly attempt a “remote control” less-lethal device, such as the expandable baton or Taser.
Advertisement — Continue Reading Below
Rules For Control
- If the person is under arrest, handcuff them first. As soon as you develop probable cause to make an arrest, handcuff them. It is much easier to control or search a handcuffed subject.
- Handcuff behind the back. There are rare exceptions, of course, for the elderly, pregnant or individuals with injuries or physical limitations/disabilities.
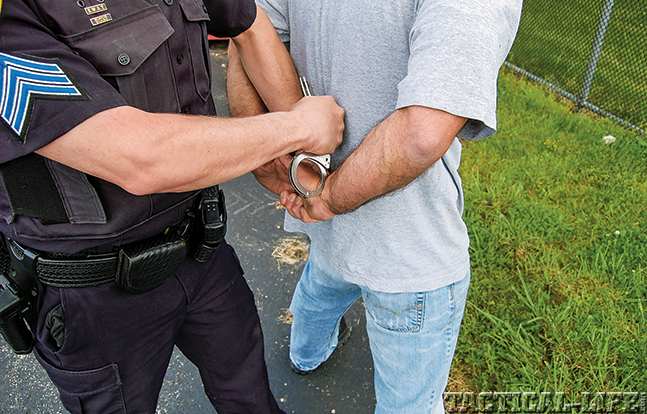
- Handcuffs are ovals; wrists are ovals. Match the oval of the cuff to the oval of the wrist. This means pressing the single bar on the top or bottom of the wrist, not the inside or outside.
- Apply the handcuffs in the “cuffing notch” between the base of the palm and the ulna and radius bones at the wrist.
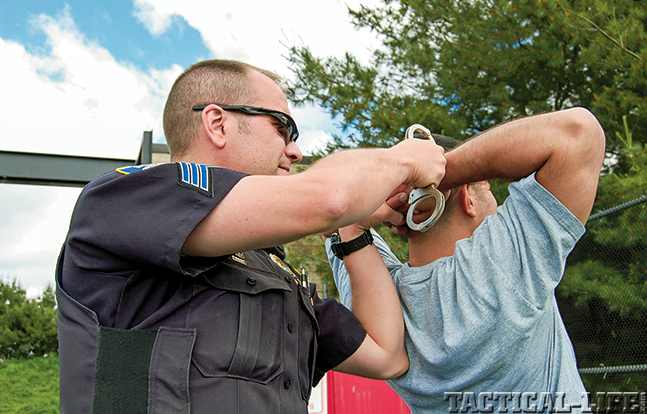
- Don’t grab the arm or wrist where you are going to cuff. “Shake hands” (palm to palm) with the suspect as you handcuff. This offers control via a joint lock (wristlock) and speeds application.
- The chains grow out of the back of the hands. This is an old rule which simply means you should ensure the handcuff chains are positioned to the back of the wrist so that, when both cuffs are applied, the back of the suspect’s hands will be facing each other behind their back, reducing mobility and the likelihood of being able to bring the cuffs under the legs to the front.
- Handcuff, then check the gap with the tip of a finger to make sure the handcuffs aren’t too tight, and then double lock the handcuffs.
- If you want to decrease resistance and increase control, take the suspect to a kneeling or prone position. You cannot and should not make every subject kneel, but if the risk or threat is greater, reduce their mobility by taking them off their feet and closer to the ground.
Handcuffing Techniques
Advertisement — Continue Reading Below
Fingers Interlaced Behind The Head:
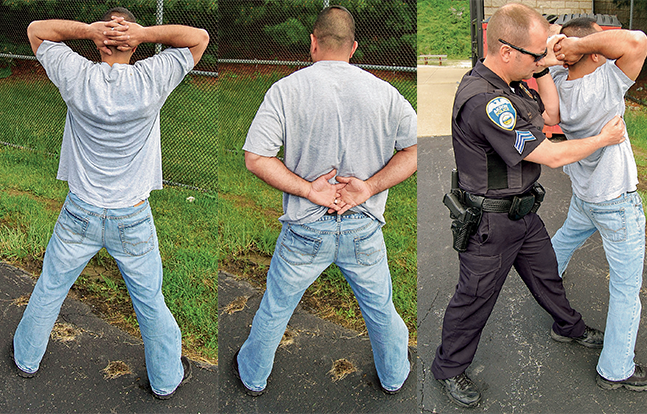
Known colloquially as the “LAPD Method” in my neck of the woods, this technique starts with the suspect standing or kneeling with their fingers interlaced behind their head. The key to this cuffing technique, which is also used to frisk suspects, is to take the person off balance to the rear. If you allow the suspect to stand upright, he or she can easily escape and/or attack. The single bar of one cuff is pressed down on the wrist at the cuffing notch. The key is to walk your hand around after the first cuff is applied to position your hand for the second handcuff application.
The cuffed wrist is then moved out from the body, with the officer moving the suspect’s wrist and their hand in between the suspect’s arm and body. This maneuver positions the suspect’s arm for application of the second cuff and offers more control. The cuffs are gripped between the lock housings.
Advertisement — Continue Reading Below
The second wrist is moved out and in with the fingers flexed downward. Try not to let loose of the fingers as you move the hand back to position for cuff application. Once the wrist is positioned, push the single bar onto the wrist and it should pivot and lock. If not, some manual manipulation may be needed.
Fingers Interlaced Behind The Back:
Advertisement — Continue Reading Below
There are several different variations on this technique. I prefer the method where the suspect’s fingers are interlaced and their palms are facing out toward you. It is more complicated and takes more practice to master, but it offers more control than the LAPD Method and other behind-the-back techniques. Once you have the suspect in this position, which may require you to physically move his hands where you want them, this technique locks the arms at the shoulders and elbows, reducing any leverage the suspect might need for escape.
The suspect is ordered to put his hands behind his back, palms together like he’s praying, and then interlace his fingers. Then you say, “Show me your palms,” which places the palms outward. You approach and grab the hand so that your palm is on the back of the suspect’s hands. The key is to grab the pinky fingers. With very little pressure, you can maintain control of the suspect and they cannot easily pull their hands apart.
To handcuff, the officer grabs the handcuff chain with the cuff at the pinky single bar facing outward. In this technique, you handcuff with the palm facing downward. Press the cuff onto the wrist at the cuffing notch. If the single bar does not pivot and lock, lift up your knee and press the cuff onto your knee or onto their back to lock it. After the first cuff is applied, separate the hands and then push the second cuff against the other wrist.
If the person is under arrest, handcuff them first. After the subject is handcuffed, a detailed search is required. Last year a subject under arrest for receiving stolen property, during which he resisted, was placed in the backseat of a police patrol SUV. After the door was closed, he quickly moved his hands under his legs and around to his front. After wiping the residual pepper spray from his face, he reached into his left front pants pocket and drew a small semi-auto pistol. The suspect then fired a shot through the driver’s side rear window and pushed himself out, attempting to escape. Officers reacted and shot and killed the armed suspect. This incident could have ended a lot worse had the offender waited until the police officer driver sat behind the wheel and then shot him. Proper cuffing and searching saves officer’s lives. Don’t shortcut or poorly perform the process.
Since the days of old, evil and guilty men have been fettered, shackled or handcuffed to be controlled by the good men protecting the citizens of the day. Make sure you take control, cuff ’em correctly and safely return home at the end of your shift.
