You often hear the term “tack driver” thrown about in reference to precision rifles, and you may wonder what that means. To me, it means a rifle capable of blowing the wings off a gnat at 100 yards.
There are many parts and pieces required to build a bolt-action rifle, and the devil is always in the details. The list of manufacturers is endless. My first bolt-action rifle was a Remington Model 700 Police in .308 Winchester. With a 20-inch barrel and threaded muzzle, it was a great first bolt gun. However, it didn’t take long to realize that there were better calibers to choose from, and even more parts available to tailor my rifle to fit my needs. I would venture to say that no rifle is the “best” because what I want and need may not be what another individual does. To build an ideal rifle, it was clear that I needed to fully understand what I wanted to use it for: competition.
Advertisement — Continue Reading Below

For almost two years, I have been competing in “tactical precision rifle” matches. This is different from your normal High Power or Benchrest/F-Class matches. You may know of these high-round-count matches through the Precision Rifle Series (PRS), Competition Dynamics (CD) or National Rifle League (NRL). It’s not uncommon to go through 150 to 200 rounds per day, with strings of fire consisting of 10 to 12 rounds. This can take a toll on your rifle, so it must be considered if you want to be competitive.
Most targets will vary in size and distance. You’ll find 1- to 3-MOA targets out to 1,200 yards at most matches. Most of my part selections were based on these parameters. The challenge was cutting weight without reducing the accuracy of the rifle or my ability to remain on target after the shot. These performance requirements created the framework for my build.
Advertisement — Continue Reading Below

Build a Bolt-Action Rifle: The Action
My choice of action came after speaking with Ted Karagias, the president of the American Rifle Company, which manufactures the Mausingfield action. This action is similar to other Remington clones, as it uses the same footprint. The trigger/safety is the same, and depending on the manufacturer, there are a few other similarities like the built-in recoil lug and the side bolt stop.

Advertisement — Continue Reading Below
But this is where the similarities end and the fun begins. The side bolt stop also acts as the ejector. There are no springs or plungers to gum up, get dirty, stick or fail. Traditional Remington actions, regardless of which style extractor they employ, need the bolt to lock in order to grab onto the rim of the cartridge. Once the extractor is engaged on the cartridge, it forces the cartridge to spin inside the chamber if unlocking and extracting. The extractor in the Mausingfield was adopted from the Mauser 98; it does not spin, pulling the cartridge straight back. I see this as a positive with more reliable feeding and extraction.
Despite all the innovation in the bolt and action body, the top rail is surprisingly a two-piece system. The rail bolts onto the action using five 8-40 hex screws. At first I questioned this approach. It has been my understanding that the less moving or bolt-on parts you have, the more accurate and reliable a rifle would be. The Mausingfield, however, uses an interlocking system in addition to the screws to prevent any wiggling or movement between the top rail and the action. Having this feature allows the end-user to choose different top rails based on his or her needs.
Build a Bolt-Action Rifle: The Barrel
Next up was the barrel. There are many barrel manufacturers out there. Some have such great reputations, customer service, knowledge and a willingness to help that they don’t need to advertise; people just know about them. One of these companies is Bartlein Barrels out of Wisconsin. I was fortunate enough to stop by Bartlein and get a tour of the facility and expand my knowledge on barrels. If I were to tell you everything I learned there, I could fill this entire publication! Bartlein is a high-end manufacturer of stainless steel and chrome-moly single-point-cut barrels. With my barrel selection complete, I added a twist.
Advertisement — Continue Reading Below

I chose to have my barrel “straightjacketed” by Dracos Barrels. Dracos machined my barrel down to a pencil profile before adding an aluminum sleeve. The void between the sleeve and barrel was filled with a proprietary compound. When baked and cured properly, this composite expands and hardens under the aluminum, applying an enormous amount of pressure on the steel barrel. This changes the way the barrel whips, essentially eliminating any cold-bore shift. Secondly, the compound and aluminum act as a heat sink, allowing for more consistent temperatures between shots. So, after reading some independent studies done on this technology, I decided to give it a try.
Advertisement — Continue Reading Below
Caliber
The caliber I chose—the 6mm XC, or simply 6XC—was developed by David Tubb, an 11-time High Power national champion. This is a short-action cartridge with a correct body taper and case length optimal for projectiles with high ballistic coefficients (BCs). I wanted something with a flatter trajectory and low recoil. Typical velocities for the 6XC range from 3,100 fps and higher. It also doesn’t hurt that several nationally ranked PRS shooters use this cartridge, and it’s the only cartridge to win the NRA Long Range Championship with a perfect score. I was sold.
Brake
Finally, I chose the ZRODelta Gen 2 Cowl Induction Brake. This brake has a very unique design with cross-machining for the ports along the side. The overall result is a small, sleek muzzle device that reportedly reduces recoil by 71 percent. In other words, no gaudy brake on the end of the barrel.

Advertisement — Continue Reading Below
No excess weight. Just business.
Build a Bolt-Action Rifle: The Stock
Stock selection can get tricky. Do you want a traditional stock or a chassis? I like the versatility of a chassis system, but a traditional stock feels more comfortable in my hands. I believe it’s a personal preference. Of the many different stocks I own, my favorites are from Manners Composite Stocks (MCS). For this particular build, I went with Manners’ new PRS2 stock. It has all the features you would expect: an adjustable cheek riser, an adjustable length of pull, aluminum pillars for bedding the action.

Another change I made from my previous stock is selecting carbon fiber in order to shave weight while retaining strength. But there are more likable features. Flush sling attachment points are included in six different locations. Additionally, the forend had been widened and flattened to provide a solid surface for shooting off barricades. The grip of the PRS2 is near vertical like many tactical stocks for a good balance of traction and trigger reach.
To finalize the stock, I needed to decide on the bottom metal hardware. For the most part, bottom metal looks like bottom metal. But the Mk-1 DBM unit from KMW Long Range Solutions stands out because of two features: the ambidextrous, low-profile magazine release and increased Z-axis support, which prevents pressure from being applied to the magazine when shooting from a supported position. Both features work to ensure you don’t drop a magazine accidently or induce a malfunction.
Build a Bolt-Action Rifle: The Trigger
There are dozens of trigger options out there—adjustable, non-adjustable, curved, flat. I’ve used Jewell and Timney triggers before, but this time I wanted something new and unique to give me a bit of an edge. This brings us to TriggerTech’s Rem 700 Diamond Trigger.

A single-point screw—accessible without having to take the action out of the stock—allows for adjustments. The screw also has a detent, with each felt “click” equaling approximately 2 ounces of pull. The sear is where things get unique. Up until now, triggers had the trigger bar directly applying pressure to the sear. When the trigger was depressed, the sear would fall, allowing the firing pin to slam forward. TriggerTech’s design places a roller bar between the trigger bar and sear, so there’s less friction and a crisp trigger pull without additional creep. It’s pretty amazing. TriggerTech offers flat and curved models, and the pull weight can be adjusted from less than 4 ounces up to 32 ounces.
Build a Bolt-Action Rifle: Call the Gunsmith
If you thought the action and barrel were the most important aspects, you were wrong. The chambering done by your gunsmith is by far the most important piece of this puzzle. One turn too far or too short—not good. Reamer concentricity off—not good. Lathe spinning too fast, creating drag marks inside the chamber—not good. I can keep going, but you get the point. Your gunsmith is putting life into your rifle, and if you’ve ever needed someone to do something so perfect, it is during the assembly.
So I chose Dane Miller Rifles (DMR) out of Las Vegas, Nevada. These guys are the original founding members of the Sin City Precision Rifle Club, and they have lots of experience in building rifles similar to mine. I was able to go to pick their brains and discuss the pros and cons of my build. DMR did everything I needed, from chambering the barrel to bedding the stock.
Their attention to detail is second to none. I would need to write another article just to cover their process for building rifles, which, believe it or not, is different and more precise than most other gunsmiths. The one thing I have learned is to find a gunsmith that you trust and believe in. Because after you miss a shot, your brain will look for plenty of excuses; you don’t want your gunsmith to be one of them.
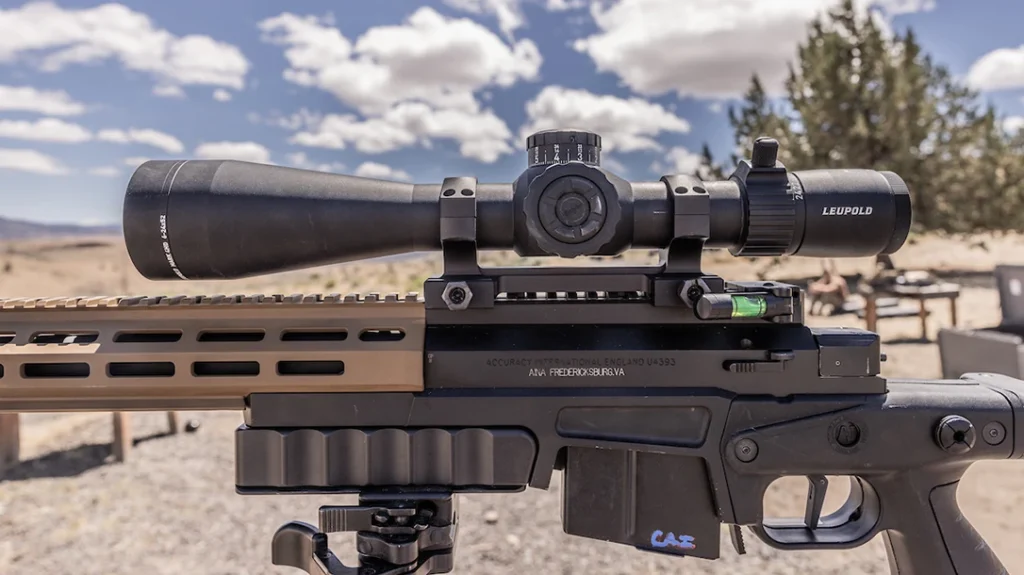
Build a Bolt-Action Rifle: Bipod & Glass
If you’ve hunted or competed, you already know that different situations call for different bipod setups—shorter, longer. If Murphy can make an appearance, he will, which is why I decided on a Modular Evolution bipod. These bipods attach to the stock via a quick-detach Picatinny rail mount. The legs are made of carbon fiber and have locking positions at 0, 45, 90 and 135 degrees. But here is the best part: The legs are also quick-detachable. There’s no need to carry an additional set of bipods that are longer. Standing, kneeling, sitting—these can do it all. Simply twist, lift and pull, then attach the length you need.

For a scope, I chose the 6-24x50mm Vortex Razor HD AMG. This was an easy decision because it’s light and offers exceptional light transmission on top of great mechanical features. It also has locking turrets—a must-have for me because I’m a klutz. If I can find a way to sabotage myself, I will. The locking turrets definitely prevent one aspect of self-inflicted sabotage.
Instead of traditional rings, I chose a Spuhr ISMS mount. It’s extremely sturdy, but its versatility and attention to detail earned my business. The ISMS has a built-in offset level that you can see without moving your head from the rifle. Also, the mount is designed so you can add Picatinny rail attachments, a cosine indicator or anything else you might want.
Build a Bolt-Action Rifle: Mission Accomplished
As you can see, the options are nearly unlimited when it comes to building a rifle exactly how you want it. This build has everything I wanted. I’ve had a few other rifles prior to this one, but none were ever built to the exact specifications that I’ve learned I’ve wanted and needed.
I hope that sharing my rifle build has opened you up to new ideas for your existing rifles or future ones. But remember: You need expert training to learn the fundamentals, no matter how great your rifle is. So start there and work your way up. Who knows, I might even see you at the range.
This article is from the 2018 issue of Ballistic Precision. To subscribe or purchase individual copies, please visit OutdoorGroupStore.com.
For More Information
- American Rifle Company: americanrifle.com
- Bartlein Barrels: bartleinbarrels.com
- Dane Miller Rifles: dmr-llc.com
- Dracos Barrels: dracosbarrels.com
- KMW Long Range Solutions: kmwlrs.com
- Manners Composite Stocks: mannersstocks.com
- Spuhr: spuhr.biz
- TriggerTech: triggertech.com
- Vortex Optics: vortexoptics.com
- ZRODelta: zrodelta.com
This post was updated on Jan. 14, 2026.